
Hiking and Backpacking Fitness: Build Leg Endurance and Protect Your Joints on the Trail

Over 63 million Americans are now active hikers, and in Australia, bushwalking consistently ranks as one of the top three physical activities for adults. Those numbers are not surprising. Hiking is accessible, deeply rewarding, and genuinely good for the body and mind. What is surprising is how many people head into longer trails or multi-day backpacking trips without any specific preparation — and then wonder why their knees are screaming on the descent or their lower back gives out by day two.
Hiking fitness is not the same as general fitness. The trail demands things a gym programme or casual walking routine simply does not prepare you for: sustained leg endurance over uneven ground, eccentric control on steep descents, hip and ankle stability on loose surfaces, and the capacity to carry a loaded pack for hours at a time. If you are over 45, those demands are worth taking seriously before you set foot on the trail — not after.
This guide covers everything you need to build genuine hiking fitness and follow a practical backpacking training plan, with a specific focus on adults who want to protect their joints, manage real-world terrain, and keep hiking for decades to come.
Medical note: If you experience persistent joint pain, swelling, or instability in your knees, hips, or ankles, get a clinical assessment before starting a new training programme. The same applies if you have a known heart or lung condition, or a history of altitude sickness. This article is informational and does not replace professional medical advice.
Key Takeaways
- Hiking fitness requires specific training beyond general walking, including eccentric leg strength, hip stability, and load-carrying capacity.
- Downhill hiking places significantly more stress on the knees than climbing — training for descent control is non-negotiable.
- Adults over 45 benefit most from a gradual, structured approach that builds strength before adding distance or pack weight.
- Trekking poles meaningfully reduce lower-limb loading and are worth using, especially on descents.
- A simple 6-week training plan can make a significant difference to trail comfort, joint health, and overall endurance.
Table of Contents
- Why Hiking Fitness Is Different From Regular Walking
- The 5 Physical Demands Every Hiker Should Train
- Best Exercises to Build Hiking and Backpacking Fitness
- A Simple 6-Week Hiking Fitness Plan
- How to Train for Downhill Hiking Without Wrecking Your Knees
- Backpacking Fitness: How to Prepare for Carrying a Pack
- Cardio Training for Hiking: Walking, Hills, Cycling, and Swimming
- Mobility and Joint Prep Before a Hike
- Altitude Basics for Hikers and Backpackers
- Sample Beginner Hiking Fitness Workout
- Common Hiking Fitness Mistakes to Avoid
- FAQ
- Final Takeaway
Why Hiking Fitness Is Different From Regular Walking
Hiking Adds Terrain, Elevation, Load, and Fatigue
Walking on flat ground at a comfortable pace is a fine baseline. It is not, however, a reliable preparation for a 20-kilometre day hike with 800 metres of elevation gain and a 12-kilogram pack. The terrain changes everything. Uneven surfaces demand constant micro-adjustments from your ankles, knees, and hips. Elevation adds cardiovascular demand and muscular fatigue at a rate that flat walking simply does not replicate. And fatigue compounds: the muscles that protect your joints work well when fresh, but after four hours on the trail, control breaks down — and that is when injuries happen.
In plain English: hiking is a skill-specific physical activity, and training for it specifically pays off.
The Main Muscles Hiking Uses
Hiking engages a wide range of muscle groups, and understanding which ones matter most helps you train smarter.
| Muscle Group | Primary Role on the Trail |
|---|---|
| Quadriceps | Eccentric control on descents, knee stability |
| Glutes (max and med) | Uphill power, hip stability, knee alignment |
| Calves and soleus | Propulsion, ankle stability, fatigue resistance |
| Tibialis anterior | Foot clearance, downhill braking, shin support |
| Hip flexors | Step height on rough terrain, stride length |
| Core (deep stabilisers) | Pack support, spinal alignment, balance |
| Hamstrings | Uphill drive, hip extension, knee control |
Hiking Fitness for Adults Over 45
Here is the real issue for adults in the 45 to 65 age bracket: the physical demands of hiking do not decrease with age, but the body’s recovery capacity and connective tissue resilience do. That is not a reason to stop hiking — quite the opposite. Regular hiking improves balance and coordination, supports cardiovascular health, and has measurable mental health benefits, including reduced anxiety and better sleep. The evidence for hiking as a longevity activity is genuinely strong.
What it does mean is that preparation matters more, not less, as you get older. A sensible starting point is building the specific strength and stability that hiking demands before you rely on it out on the trail.
For broader context on how structured exercise supports long-term health, the Exercise Guide for Better Health at All Perfect Health covers the foundational principles well.
The 5 Physical Demands Every Hiker Should Train
1. Leg Endurance for Long Days on the Trail
Leg endurance is the capacity to keep moving, under load, for extended periods without your form breaking down. It is built through a combination of cardiovascular conditioning and muscular endurance training — higher-rep, lower-load exercises combined with progressive walking volume.
2. Uphill Strength for Climbs and Step-Ups
Climbing requires hip extension power (glutes and hamstrings) and quad drive. Step-ups onto elevated surfaces are one of the most direct ways to train this. The height of the step matters: start low (20–30 cm) and progress to 40–50 cm as strength improves.
3. Downhill Control for Knee Protection
This is where most hikers run into trouble. Descending places eccentric load on the quadriceps — meaning the muscle is lengthening under tension, which is more demanding than the concentric (shortening) phase of climbing. Research consistently shows that downhill walking generates significantly higher knee joint forces than level or uphill walking. Training eccentric quad strength before the trail is not optional if you want to protect your knees.
4. Hip, Knee, and Ankle Stability on Uneven Ground
Stability on uneven ground requires coordinated strength across the hip abductors, deep glute stabilisers, and ankle dorsiflexors. This is the category most people skip — and it is the one most likely to cause a rolled ankle or a knee that tracks inward on tired legs.
5. Load-Carrying Capacity for Backpacking
A loaded pack changes your centre of gravity, increases spinal compression, and adds to the cumulative fatigue on your lower limbs. The body adapts to this load — but it needs progressive exposure to do so safely. Simply putting on a heavy pack and heading out is a reliable way to end a trip early.
Best Exercises to Build Hiking and Backpacking Fitness

Let’s keep this practical. The following exercises are selected specifically for their relevance to trail demands. They do not require a gym, though access to a step, a resistance band, and a light set of dumbbells helps.
Step-Ups
Stand in front of a sturdy step or box (20–40 cm). Step up with one foot, drive through the heel to stand fully upright, then lower the other foot back down with control. The upward phase trains uphill strength. The lowering phase trains eccentric control. Both matter.
- Sets: 3 x 10–12 per leg
- Progression: Add height or hold light dumbbells
Controlled Step-Downs
Stand on a step. Lower one foot slowly toward the floor, bending the standing knee to 45–60 degrees, keeping the knee tracking over the second toe. Do not let the knee collapse inward. Return to standing. This is the single most important exercise for downhill knee control.
- Sets: 3 x 8–10 per leg
- Focus: Slow, controlled descent — 3 seconds down
Split Squats or Supported Lunges
These build single-leg quad and glute strength in a way that mirrors the asymmetric demands of trail walking. Use a chair or wall for support if balance is a limiting factor.
- Sets: 3 x 10 per leg
- Progression: Elevate the rear foot (Bulgarian split squat) for greater challenge
Glute Bridges or Hip Thrusts
Lie on your back, feet flat on the floor, knees bent. Drive through the heels to lift the hips, squeezing the glutes at the top. This builds posterior chain strength that supports both uphill power and knee stability.
- Sets: 3 x 15
- Progression: Single-leg version, or add a resistance band above the knees
Romanian Deadlifts or Hip Hinges
Hold light dumbbells, hinge at the hips with a soft knee bend, lowering the weights toward the floor while maintaining a neutral spine. This trains the hamstrings and glutes in a lengthened position — directly relevant to downhill control.
- Sets: 3 x 10–12
- Key cue: Push the hips back, not the chest down
Calf Raises and Tibialis Raises
Calf raises (standing on the edge of a step, heel drop and rise) build propulsion and ankle stability. Tibialis raises (sitting or standing, lifting the toes toward the shin) are often neglected but are critical for downhill foot clearance and shin fatigue prevention.
- Sets: 3 x 15–20 each
Lateral Band Walks or Side-Lying Leg Raises
Place a light resistance band above the knees. Walk sideways in a shallow squat position. This targets the hip abductors (glute medius), which are the primary stabilisers of the knee during single-leg stance — every step on the trail.
- Sets: 3 x 15 steps each direction
Balance Drills
Single-leg standing (eyes open, then eyes closed) and single-leg standing on an unstable surface (folded mat, wobble board) train the ankle and hip proprioception that keeps you upright on loose terrain.
- Start: 3 x 20–30 seconds per leg
Core Exercises for Pack Support
Dead bugs, bird dogs, and planks build the deep core stability that supports a loaded pack and protects the lower back on long days. These are not about aesthetics — they are about spinal endurance under load.
A Simple 6-Week Hiking Fitness Plan
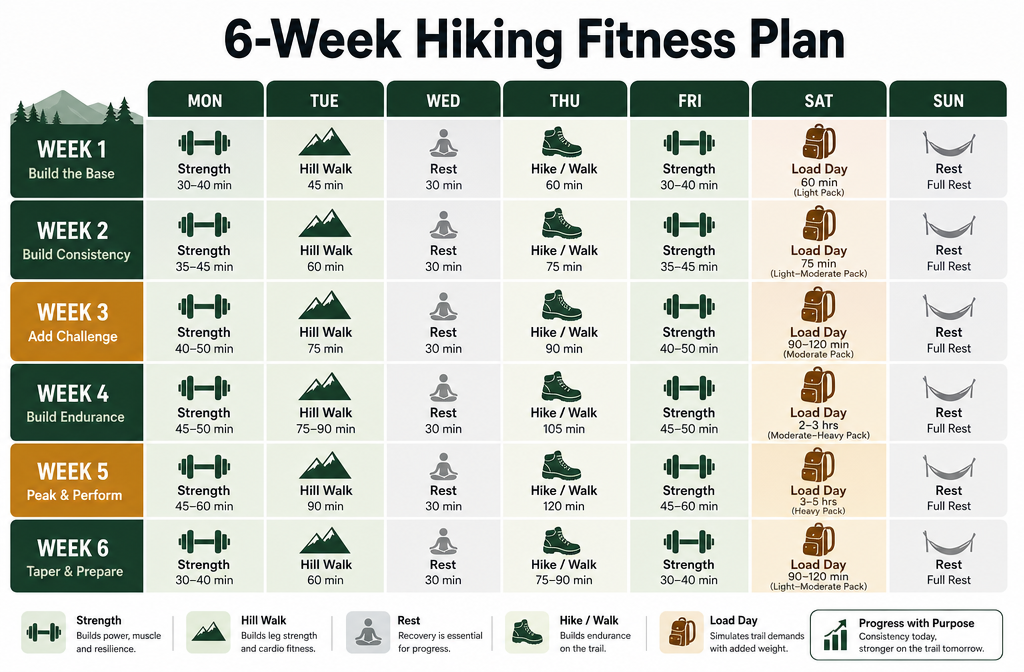
Who This Plan Is For
This plan suits adults who are reasonably active — comfortable walking 5–8 km — but who want to prepare specifically for a longer hike or multi-day backpacking trip. It is designed to be progressive, joint-friendly, and realistic for people with work and family commitments.
Weekly Structure
| Session Type | Frequency |
|---|---|
| Strength training | 2 x per week |
| Hiking or hill walking | 1–2 x per week |
| Light cardio (cycling, swimming) | 1 x per week (optional) |
| Rest or gentle mobility | 2 x per week |
Weeks 1–2: Build the Base
Focus: Movement quality, joint tolerance, baseline endurance.
- Strength: Step-ups (low box), glute bridges, calf raises, balance drills. 2 sets each, moderate effort.
- Walk: 2 x 45–60 minute flat or gently undulating walks. Focus on posture and steady pace.
- No pack weight yet.
Weeks 3–4: Add Hills and Controlled Descents
Focus: Introduce elevation and eccentric loading.
- Strength: Add controlled step-downs, split squats, lateral band walks. Move to 3 sets.
- Walk: 1 x flat walk + 1 x hill walk (200–400 m elevation gain). Include deliberate downhill sections at controlled pace.
- Begin single-leg balance on unstable surface.
Weeks 5–6: Practice Trail-Specific Load
Focus: Simulate trail conditions, introduce pack weight.
- Strength: Full programme at 3 sets. Add Romanian deadlifts and core work.
- Walk: 1 x longer hill walk (8–12 km with 400–600 m gain). Carry a light pack (4–6 kg).
- Add one deliberate downhill training session: slow, controlled descents on steps or a gentle slope.
How to Progress Without Overdoing It
The simplest way to look at it is this: increase one variable at a time. Either add distance, or add elevation, or add pack weight — not all three simultaneously. If joint soreness persists beyond 48 hours after a session, reduce the load and allow more recovery time. More is not always better, and that is especially true for adults over 45.
For a broader look at how sport-specific training principles apply across different activities, the Complete Guide to Sport-Specific Training is worth reading alongside this plan.
How to Train for Downhill Hiking Without Wrecking Your Knees
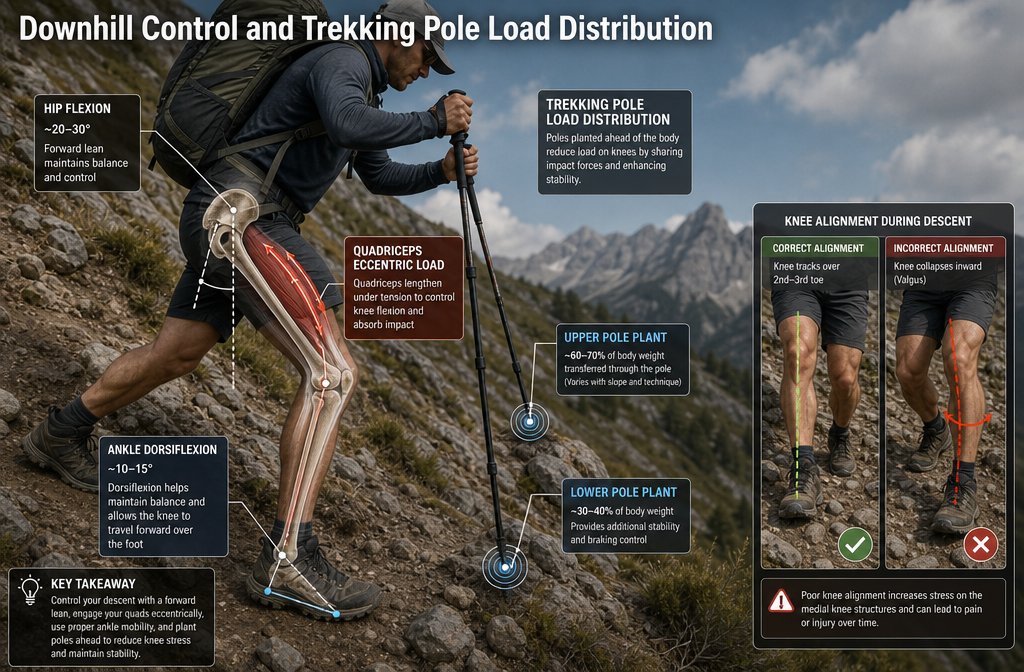
Why Downhill Walking Feels Worse Than Climbing
Most hikers expect the uphill to be the hard part. In reality, the descent is where the damage accumulates. When you walk downhill, your quadriceps act as brakes — contracting eccentrically to slow your descent and control knee flexion. This type of muscle action causes more micro-damage to the muscle fibres than concentric contraction, which is why you feel the soreness the day after a big descent, not the climb.
Research on lower-limb loading confirms that knee joint forces during downhill walking are substantially higher than on flat or uphill terrain. The patellofemoral joint (the interface between the kneecap and the femur) is particularly exposed. For adults with any history of knee discomfort, this is the specific demand to train for — not avoid.
Build Eccentric Strength Before You Need It
The controlled step-down exercise described earlier is the most direct preparation. Slow, loaded descents — whether on stairs, a step box, or a gentle slope — progressively adapt the quad tendons and knee structures to the braking demands of downhill walking.
Practical tip: On the trail, shorten your stride on descents, bend your knees slightly more, and use trekking poles. Research supports the use of poles for reducing lower-limb loading — particularly at the knee — during downhill sections. The poles effectively transfer some load to the upper body, which is exactly what you want when your legs are fatigued.
When Knee Pain Is a Warning Sign
There is a difference between muscle fatigue and joint pain. Aching quads after a long descent is normal adaptation. Sharp pain inside the knee, pain that worsens with rest, swelling, or a sensation of instability is not something to push through. These are signals to stop, rest, and seek a clinical assessment. Ignoring them on a multi-day trip is how a manageable problem becomes a serious one.
Backpacking Fitness: How to Prepare for Carrying a Pack
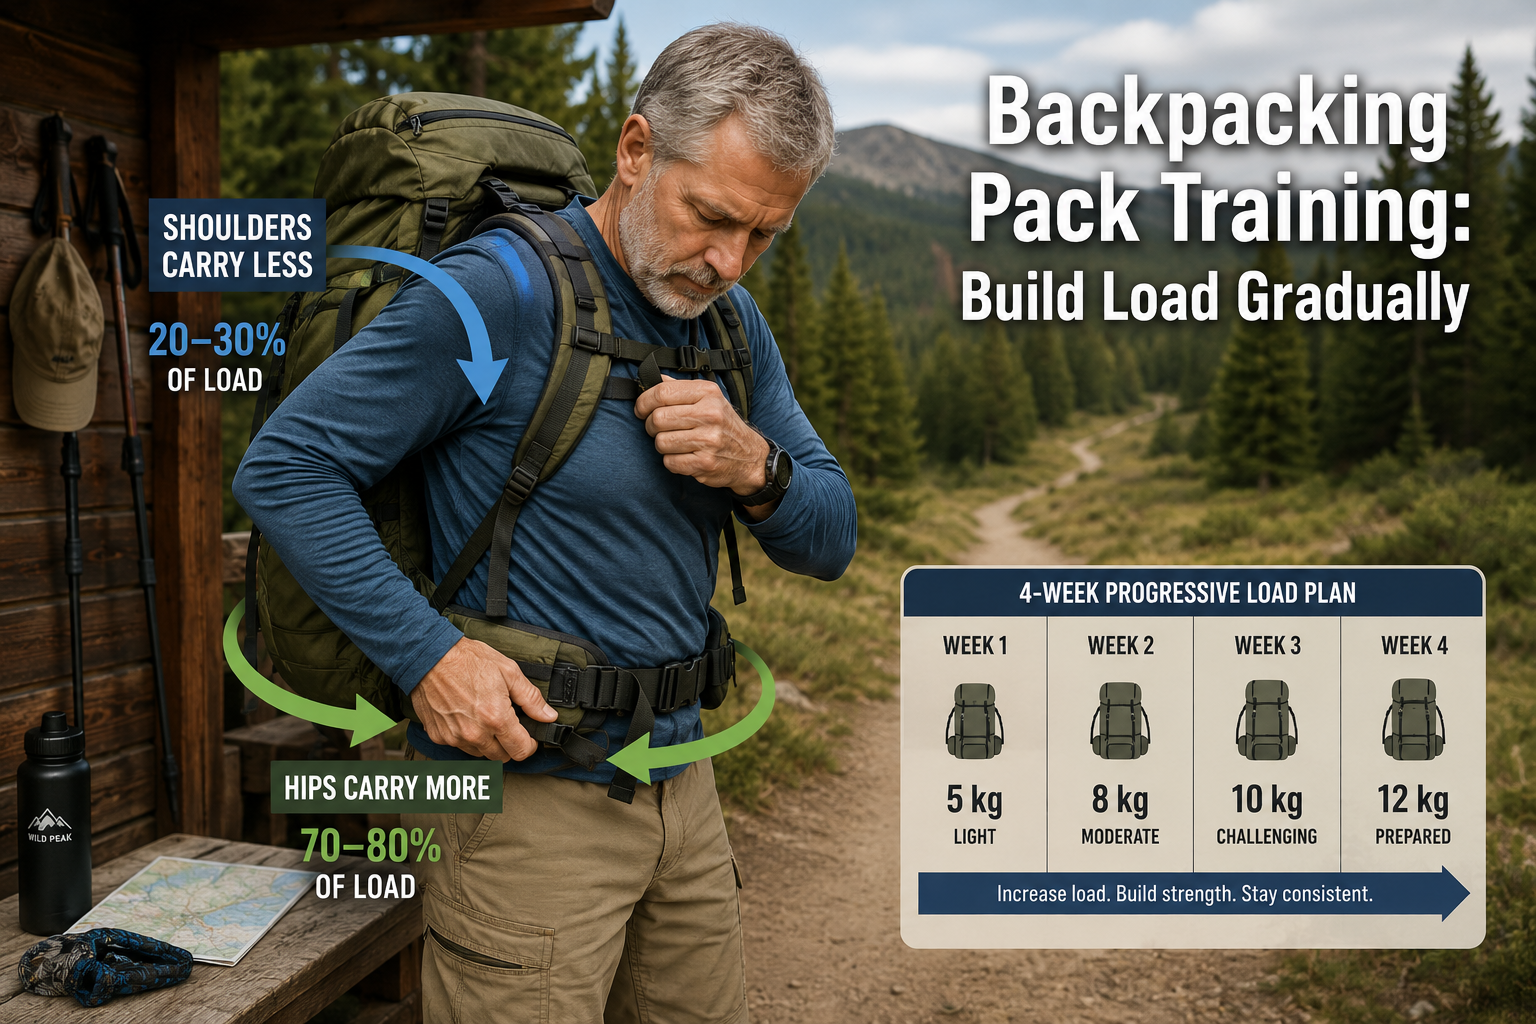
Why Pack Weight Changes Everything
A 10-kilogram pack does not just add 10 kilograms of effort. It shifts your centre of gravity backward and upward, increases the compressive load on your lumbar spine, and adds to the cumulative fatigue on your knees and ankles with every step. On a flat road, this is manageable. On a steep, uneven trail after six hours, it is a meaningful physical challenge.
The good news is that the body adapts well to load-carrying when the exposure is progressive. A proper backpacking training plan builds this capacity systematically rather than hoping the trail itself will do the job.
How to Add Pack Training Safely
- Start light: Begin with 4–5 kg and walk your normal routes.
- Add weight gradually: Increase by 1–2 kg per week, not per session.
- Prioritise fit over weight: A poorly fitted pack creates pressure points and alters gait mechanics in ways that accelerate fatigue and injury risk. Get a pack fitted properly before you start load training.
- Train on terrain: Once you are comfortable with the weight on flat ground, move to hills. The combination of load and elevation is what the trail will demand.
Pack-Carrying Exercises
Beyond walking with a pack, the following exercises directly support load-carrying capacity:
- Farmer’s carries: Walk a set distance carrying dumbbells or a loaded bag in each hand. Builds grip, shoulder, and core endurance.
- Weighted step-ups: Perform step-ups with a loaded pack on. This directly simulates uphill trail conditions.
- Loaded planks: Hold a plank position with a light pack on your back. Builds the spinal endurance needed for long pack-carrying days.
Mistakes to Avoid With Pack Training
- Loading the pack too heavy too soon (the most common error)
- Wearing a pack that does not fit correctly
- Skipping hip belt use — the hip belt should carry 70–80% of the load, not the shoulders
- Neglecting core training, which is the primary support structure for a loaded spine
Cardio Training for Hiking: Walking, Hills, Cycling, and Swimming
Walking Is the Base
There is no magic in it — walking is the most specific cardio preparation for hiking. The movement patterns, muscle recruitment, and joint loading are directly transferable. The key is progressive volume: gradually increasing duration and elevation gain over the weeks before your target hike.
For those just returning to regular walking, the How to Start Walking for Exercise guide at All Perfect Health provides a solid starting framework.
Hill Walking Builds Trail-Specific Endurance
If you have access to hills, use them. Even a modest hill repeated several times in a single session builds the cardiovascular and muscular endurance that flat walking cannot replicate. The descent is equally important — use it as deliberate eccentric training, not just the way back to the car.
Cycling and Swimming Can Support Hiking Fitness
Cross-training has genuine value, particularly for adults managing joint load or recovering from minor soreness. Cycling builds quad and glute endurance with low impact on the knees and hips. Swimming develops cardiovascular capacity and upper body endurance without any compressive joint load at all.
Neither cycling nor swimming replicates the specific demands of trail walking — but both maintain aerobic fitness and allow recovery while keeping the body active. The Health Benefits of Swimming article covers what the evidence actually shows about swimming as a fitness tool.
Stair Training: Useful but Easy to Overdo
Stair climbing is an excellent hiking-specific cardio tool. It is also easy to overdo, particularly on the descent. Start with climbing only and add controlled descents once eccentric strength is established. Stair training three times per week is plenty — more than that, and the cumulative knee load can become counterproductive.
Mobility and Joint Prep Before a Hike
5-Minute Pre-Hike Warm-Up
A brief dynamic warm-up before setting off is worth the time. The goal is to increase blood flow to the working muscles and move the joints through their functional range before placing them under load.
Simple pre-hike sequence (5 minutes):
- Leg swings — forward and lateral, 10 each side
- Hip circles — slow, controlled, 10 each direction
- Ankle circles — 10 each direction per foot
- Shallow bodyweight squats — 15 slow reps
- Calf raises — 15 reps
- 3–5 minutes of slow walking before increasing pace
Hip Mobility for Better Knee Tracking
Restricted hip mobility is a common contributor to knee problems on the trail. When the hip cannot move freely, the knee compensates — and that compensation, repeated thousands of times over a long hike, accumulates stress. Hip flexor stretches, pigeon pose variations, and lateral hip mobility work are all worth including in a regular routine.
Ankle Mobility for Trail Stability
Ankle dorsiflexion — the ability to bring the toes toward the shin — is critical for navigating uneven terrain and for safe downhill mechanics. Restricted ankle mobility forces compensatory movement at the knee and hip. A simple wall ankle stretch (knee-to-wall drill) performed daily can make a meaningful difference over a 4–6 week preparation period.
Recovery After Long Hikes
Recovery is where adaptation happens. After a long hike or training session, prioritise:
- Protein intake within 2 hours to support muscle repair
- Elevation of the legs if there is significant swelling or fatigue
- Light movement the following day rather than complete rest — a 20-minute walk keeps circulation moving without adding stress
- Sleep — the evidence for sleep as a recovery tool is strong and often underestimated
Magnesium plays a role in muscle recovery and sleep quality. The Magnesium-Rich Foods guide covers the best dietary sources if you are looking to support recovery through nutrition.
Anti-inflammatory foods also have a practical role in managing post-hike soreness. The Anti-Inflammatory Foods Ultimate Guide provides a clear, evidence-based overview.
Altitude Basics for Hikers and Backpackers
Fitness Helps, But It Does Not Guarantee Altitude Tolerance
This is where hype gets in the way of honest advice. Being physically fit improves your capacity to perform at altitude, but it does not protect you from acute mountain sickness (AMS). AMS is primarily a response to the rate of ascent and the altitude reached — not fitness level. Highly trained athletes get altitude sickness. Sedentary individuals sometimes acclimatise without difficulty.
The stronger evidence points to gradual ascent as the most effective prevention strategy. The general guidance for altitudes above 2,500 metres is to ascend no more than 300–500 metres of sleeping altitude per day, with a rest day every 3–4 days.
Practical Altitude Prep Tips
- Acclimatise before ascending: If possible, spend 2–3 days at an intermediate altitude before moving higher.
- Hydrate well: Dehydration worsens altitude symptoms. Drink consistently, not reactively.
- Recognise the symptoms: Headache, nausea, fatigue, dizziness, and poor sleep are common early signs of AMS. If symptoms worsen or include confusion, loss of coordination, or breathlessness at rest, descend immediately.
- Consult a travel medicine specialist: If your planned hike involves altitudes above 3,000 metres, a pre-trip consultation is sensible. Preventive medication (such as acetazolamide) may be appropriate for some individuals.
What Not to Promise
It is not that simple to train your way out of altitude risk. Fitness training at sea level does not meaningfully improve altitude acclimatisation. Interval training, breath-hold training, and altitude tents have varying and often modest evidence behind them. I would be careful with any product or programme that promises altitude immunity through pre-trip conditioning.
Sample Beginner Hiking Fitness Workout
30-Minute Strength Session
| Exercise | Sets | Reps | Notes |
|---|---|---|---|
| Bodyweight step-up (20 cm) | 3 | 10 per leg | Slow, controlled |
| Controlled step-down | 3 | 8 per leg | 3 seconds down |
| Glute bridge | 3 | 15 | Squeeze at top |
| Lateral band walk | 3 | 15 steps each way | Shallow squat position |
| Calf raise | 3 | 20 | Full range on step edge |
| Tibialis raise | 3 | 15 | Seated or standing |
| Single-leg balance | 3 | 30 sec per leg | Eyes open, then closed |
| Dead bug | 3 | 10 per side | Slow and controlled |
45-Minute Trail Prep Walk
- 5 minutes: flat warm-up at easy pace
- 30 minutes: undulating terrain or repeated hill (aim for 100–200 m elevation gain)
- 10 minutes: deliberate downhill at controlled pace, shorter stride, slight knee bend
Short Downhill Control Finisher
After the walk, find a set of stairs or a gentle slope. Perform 5–8 slow, controlled descents, focusing on knee tracking and quad engagement. This is brief but specific — it trains exactly the movement pattern that causes most trail knee problems.
Common Hiking Fitness Mistakes to Avoid
- Only walking on flat ground in preparation: Flat walking does not prepare the body for elevation or descent demands.
- Skipping eccentric training: The downhill is where injuries happen. Train for it specifically.
- Adding pack weight too quickly: Progressive load is the principle. Jumping straight to a full pack is a common and avoidable mistake.
- Ignoring ankle and hip mobility: Restricted mobility at these joints transfers stress to the knees. Address it before the trail does.
- Training too hard too close to the trip: The final week before a major hike should be a taper — reduced volume, maintained quality. Arriving fatigued is worse than arriving slightly undertrained.
- Treating joint pain as normal soreness: Muscle fatigue is expected. Sharp joint pain, swelling, or instability is a clinical signal, not a training cue.
- Neglecting nutrition and recovery: Hiking fitness is built between sessions, not during them. Sleep, protein, and anti-inflammatory foods all contribute to how well the body adapts.
FAQ
Is hiking enough exercise by itself?
For general health, yes — hiking provides meaningful cardiovascular, musculoskeletal, and mental health benefits. For preparing for more demanding hikes, it is not sufficient on its own. Strength training for eccentric control, stability, and load-carrying capacity adds a layer of resilience that hiking alone does not build efficiently.
How do I get in shape for hiking if I am over 45?
Start with the specific exercises in this guide — step-ups, controlled step-downs, glute work, and balance drills — before adding distance or elevation. Build progressively over 4–6 weeks. The goal is not to get generally fit; it is to prepare the specific muscles, joints, and movement patterns that hiking demands.
What muscles should I strengthen for hiking?
The priority muscles are the quadriceps (especially for downhill control), glutes (for uphill power and knee stability), calves and tibialis anterior (for ankle stability and foot clearance), and the deep core (for pack support and spinal endurance). Hip abductors (glute medius) are often neglected but are critical for knee tracking on uneven ground.
Why do my knees hurt when hiking downhill?
Downhill walking places high eccentric load on the quadriceps and patellofemoral joint. If the quads are not conditioned for this demand, the knee absorbs more stress than it should. Trekking poles help by transferring some load to the upper body. The longer-term solution is building eccentric quad strength through controlled step-downs and slow descents in training.
How do I train for backpacking with a heavy pack?
Start with a light pack (4–5 kg) on your normal walking routes and increase weight by 1–2 kg per week. Ensure the pack fits correctly and the hip belt is doing most of the work. Add weighted step-ups and farmer’s carries to your strength sessions. Build core endurance with loaded planks and dead bugs. Do not attempt a full-weight pack on technical terrain until you have several weeks of progressive load training behind you.
Are trekking poles good for knee pain?
The evidence supports trekking poles as a useful tool for reducing lower-limb loading, particularly at the knee, during downhill sections. They are not a substitute for building eccentric strength, but they are a sensible addition — especially for adults with a history of knee discomfort or on longer, steeper descents.
How long before a hiking trip should I start training?
A minimum of 6 weeks is a sensible starting point for most adults. 8–12 weeks is better if the target hike is demanding (significant elevation, multi-day, or with a loaded pack). The final week should be a taper — reduced volume, not increased effort.
Can cycling or swimming help with hiking fitness?
Yes, both are useful cross-training tools. Cycling builds quad and glute endurance with low joint impact. Swimming develops cardiovascular capacity and upper body endurance. Neither replicates trail-specific demands, but both support aerobic fitness and allow active recovery. They are most useful as complements to walking and strength training, not replacements.
Final Takeaway: Train for the Trail Before the Trail Trains You
The main takeaway is this: hiking fitness is a specific physical quality, not a byproduct of general activity. The trail will expose every weakness — tight hips, undertrained quads, poor ankle stability, an unconditioned core — and it will do so at the worst possible time, usually on a steep descent, hours from the trailhead.
The good news is that the preparation is not complicated. A structured 6-week plan, a handful of targeted exercises, and a gradual approach to load and elevation will make a genuine difference to how your body handles the trail — and how it recovers afterward. For adults over 45, this kind of preparation is not excessive caution. It is the practical, evidence-aware approach to staying active and injury-free for the long term.
The basics still do the heavy lifting. Step-ups, controlled step-downs, glute work, balance drills, and progressive walking volume — done consistently over 6 to 8 weeks — will prepare most adults for a challenging day hike or a first multi-day backpacking trip far more effectively than any specialised gadget or programme.
Hiking is one of the best forms of outdoor longevity training available. The investment in preparation is modest. The return — stronger legs, more confident descents, healthier joints, and more years on the trail — is substantial.
For a broader framework on how to apply these principles across different sports and outdoor activities, the Sport-Specific Training: The Complete Practical Guide brings together the evidence on targeted physical preparation in one place.
References
| # | Citation purpose | Source | URL |
|---|---|---|---|
| 1 | Older adult exercise guidelines: aerobic activity, strength training, balance, and multicomponent exercise | U.S. Office of Disease Prevention and Health Promotion, Physical Activity Guidelines for Americans | https://odphp.health.gov/our-work/nutrition-physical-activity/physical-activity-guidelines/current-guidelines |
| 2 | Hiking fitness training structure: strength, endurance, balance, cardio, and pack preparation | REI Co-op Expert Advice, How to Train for Hiking: Tips & Exercises | https://www.rei.com/learn/expert-advice/hiking-training.html |
| 3 | Downhill hiking mechanics: eccentric load, loaded downhill walking, quad fatigue, and descent preparation | Chalchat E, Siracusa J, Peñailillo L, Malgoyre A, Bourrilhon C, Charlot K, Martin V, Garcia-Vicencio S. Neuromuscular and Metabolic Responses during Repeated Bouts of Loaded Downhill Walking | https://arxiv.org/abs/2309.09554 |
| 4 | Trekking poles and knee support: balance, lower-limb strain reduction, and downhill walking support | Verywell Health, Should You Use a Walking Stick? | https://www.verywellhealth.com/reasons-you-should-use-a-walking-stick-walking-poles-7562791 |
| 5 | Altitude basics: acclimatisation, altitude illness risk, gradual ascent, and why fitness does not guarantee altitude tolerance | Centers for Disease Control and Prevention, CDC Yellow Book, High-Altitude Travel and Altitude Illness | https://wwwnc.cdc.gov/travel/yellowbook/2024/environmental-hazards-risks/high-altitude-travel-and-altitude-illness |
Related APH Guides
- The Complete Guide to Sport-Specific Training — The broad guide covering the SAID principle and 4 pillars of sports conditioning.
- Tennis and Pickleball Conditioning for Adults 50+ — Agility, shoulder health, and reaction speed for racquet-sport players.
- Cycling Fitness: Build Leg Power, Core Stability, and Endurance on the Bike — Lower-body conditioning for cyclists and spin enthusiasts.
- Strength Training for Runners — Posterior chain work to improve running economy and reduce injury risk.
- Best Exercises for Golf — Rotation, power, and spinal resilience for a stronger, safer swing.
- Sport-Specific Training cluster page — Browse all sport-specific articles on APH.
- Joint-Friendly & Age-Specific Exercise — Low-impact options for older adults and those managing joint concerns.
About the author
Dave James is a health researcher and writer specialising in evidence-based nutrition, exercise, and longevity. He founded All Perfect Health to provide clear, practical health guidance rooted in current research and real-world experience.